Here’s the scenario. You have a site you created locally. It has file uploading. You have a domain name. You don’t want to take forever compiling assets and doing all that stuff to push the code to a server.
Okay, that’s probably not a lay up that you have all those things. But I had to find a way to get those images to same in production and find an easy way just to push the code to production.
To do this I used three things:
Let’s start from the top. Heroku. Things to note here. You have to use at least rails 3 and ruby 2. I was not using ruby 2 so we have to go into our gemfile and add the line:
ruby ‘2.0.0’
and then run the bundler. You might have an issue or two with other gems but the bundler usually tells you that you can do to fix it.
Now, Heroku also requires you use a Postgresql database in production, so we need to take our sqlite3 db and add it to the test and development groups on our gem file and add the ‘pg’ gem to our production group. Bundle it. Okay Heroku is “ready”.
Now on to AWS. This is where I will be storing my files that are uploaded to my application. Since CarrierWave is just hosting them locally, I will need a way for those files to work in production. To set up AWS, you need to first go and create an account. I’m not going to tell you how to do that. First, you need to add the “fog” gem to your gemfile and bundle.
Then make an initializer file. Mine is called “carrierwave.rb” because I am using carrierwave for file processing. Here is my initializer file:
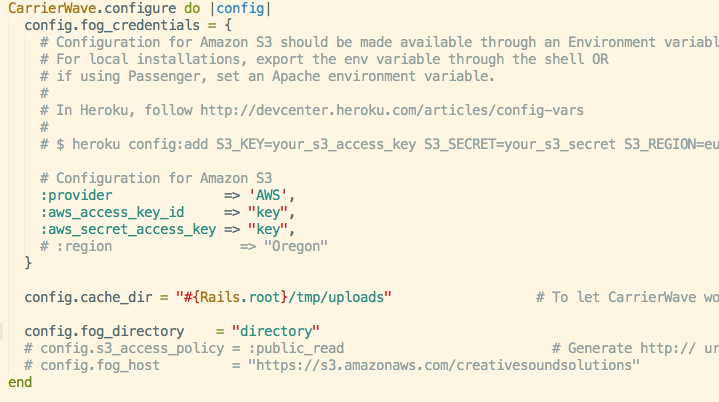
Pretty simple all we have to do if add our aws_access_key_id, aws_secret_access_key, and our fog_directory. Super simple, and now when we upload files they will be saved in our backer on S3.
Let throw it up on heroku and see what’s going on. Follow this tutorial if you don’t know how to set yourself up on Heroku. It’s a joke how easy it is.
But now we have a app on Heroku and the files are storage on AWS so they will work in production, but now we want to use our super cool domain that we bought from GoDaddy. No problem. Enter DNS Simple.
We head to DNS Simple, and set up an account. After we log in, we add a domain. Then we go to services, and scroll down to Heroku and click on that. Then we go back and click on the Advanced Editor where we see our domain with an ALIAS and CNAME. Change the content of the ALIAS to your url (with the www) and the content of the CNAME to your heroku app’s url. This tells your domain to redirect everything to your heroku url. Now head on back to heroku and go into the settings of your app. GO down to url’s and add the the cool url.
You have now successfully pushed an app to production, made the files work in production, and set up that code on your fancy url. Nice