It’s been a long time since I last blogged (I think 3-4 weeks or so). I’ll quickly fill you in with what’s been going on. I had a bunch of interviews with some really cool companies so I was doing a lot of coding challenges on top of all of my contract work. I was a busy beaver.
But now I am so happy to say that I have found a home at StreetEast. The really cool thing is out of all the companies I interviewed with, they were by far the one I wanted the most.
As far as this blog is concerned, I can promise you that I will be writing about some really cool stuff on here. For example, while my new laptop is downloading Mac OS X, I had a chance to look at the rails app, and yep, theres only like 150 models.
Seeing something like that makes me so excited because I know I have so much to learn. I have met all of the members of the team and everyone is super awesome. Can’t wait to see how awesome these next few weeks will be in learning the new code base and well just learning a ton in genral.
Hadn’t been able to blog as much as I wanted in the last few days so I thought I’d write about something cool. Lately, an app I have been working on has the potential to be seen by a very high volume of users, so in creating this application performance has to be something I am considering.
So then to that extent I ask you, “What’s the difference between
Model.all.count
and
Model.count?”
Let’s assume that the model we are referring to is Event. Right now, in one of my apps I have roughly 350 or so events in my database. Not big but can still serve the purpose of this blog post. Both lines of code return us the same count, 350 or so. With that I’m mind, what’s the difference?
Well when we run Event.all what does that do? That returns an array of events. So then we would be running count on that array of events. Effectively, our SQL query would be something like SELECT "events".* FROM "events". We would load the array and then run a count query on that array.
When we run Event.count are we running count on an array? No we are not. Effectively, our SQL query here is SELECT COUNT(*) FROM "events". Here, we are running a count query on the DB.
Here is the scenario you are in. You built a Rails app. Congrats. You have also pushed you app to Heroku. Even better. But after every hour, your Heroku server is seemingly shut down; that’s why it can be free because it’s not always “in use”.
This is a teaser post. For the last few days I have been using a pretty popular ruby gem that was not working correctly. With the help of a few people, I was able to find the error, make the correction, and write a passing test for the new code. I have sent a pull request and hopefully it is accepted. If it is I will write about it. Could be my first open source commit.
This post will show a step by step tutorial of how to create a rails app with Angular.js on the front-end and allow you to successfully create an object and view those objects.
First, lets create the rails app
rails new angular
After you cd into the app, we are going to create a resource for the model we are going to have. A resource will provide you with the model, an empty controller, a views folder with no views, and resourced routes for that model. Close to scaffolding but not really. Lets make a user model and give it a name:
rails g resource user name
and don’t forget to migrate the database.
rake db:migrate
Next we have to create a controller with just an index action because the entire app will take place in that single action. Lets call the controller home.
rails g controller home index
Next we have to remove the public/index.html file and make sure to add the home#index route as your root route:
root :to => “home#index”
Remember that empty user controller? We have to go back to it now and create the RESTful data source for our app to interact with. It’s really not too too crazy. For the purposed of this app we are only going to have an index action and a create action:
Now we need to add Angular.js to the app. In your Gemfile, and in the assets group, we need to add the Angular.js gem:
gem ‘angularjs-rails’
And in our application.js file, we need to add the following lines:
//= require angular //= require angular-resource
Awesome, were doing pretty well thus far. Next we have to tell our app “Hey, you need to be in Angular.js”, so go over to your application layout file and look for your html tag. We need to add something to this tag to tell the app it’s going to be in Angular. For this we do the following:
html ng-app
This directive is used to flag the html element and tell it that Angular should be considered the root element of our application. You can add a directive like this to other elements in your app if you wish to not have the entire app be Angular.
That is your basic setup. We have Angular in our app and our html elements is ready.
Now we have a view. I’m going to show the view and then talk about whats going on here:
<divng-controller="UserController"><ul><ling-repeat="user is users"> {{ user.name }}
</li></ul><form><inputtype="text"ng-model="newUser.name"placeholder="name"><buttonng-click="addUser()">Add User</button><br><span>{{newUser.name}}</span></form></div>
At the top of the view we have:
div ng-controller=“UserController”
Eventually, we will create an Angular controller, and what we are doing here is saying, “Anything in this div refers to the UserController”. We are then creating a list, and each list item has the following code attached:
li ng-repeat=“user in users”
Eventually, we will have an array of users, and ng-repeat is a way to iterate through the array. And then we simply list the users names.
Next we have a form with an input field. This input field has:
ng-model=“newUser.name”
This ng-model is almost like a variable in that we will be setting this ng-model to whatever we put in the input field.
Then we have a button that has:
ng-click=“addUser()”
We are attaching ng-click to the button and that will run an addUser function that we will have to create. In the span element, you will see a double binded value of the input field. When you are typing in text to the input field, it will show here. It’s more of a cool thing to have than necessary. Now all we need is that angular controller.
At the top, we create a module which we call “User”. Going back to our layout file, we need to add this module to our directive. That html element will now look like this:
html ng-app=“User”
To create a controller in Angular is like creating a javascript class, with a function. We create it by adding in a scope. A scope is an object that refers to the application model, kinda like self in ruby or this in javascript, but also not really.
In order to set our array, remember its called users in the view, we have to find a way to get that data of users from the database. Remember when we added angular-resource to the application.js file, and remember when we added ngResource to our module? We did this to set up Angular resource which allows you to interact with restful server side data source (our user controller in railsland).
In that first line we are saying, set the User variable to all the objects at the route “/users.json”. The reason we cannot simply give the route of “/users” is because the return html and not json. In the next line we set the scope.users to User.query(). The query function allows you to GET an array.
Awesome now all we want to do is add users to that array. In the view, the button had an ng-click=“addUser()” on it. We needed to create that function and we do it here. Here we are getting the input from the form field with an ng-model of newUser.name and saving it to the object. In angular, the .save method is used to create an object and not update it. Then all we do is push that entry into the users array that we set above and set the input field to blank.
Now we can create an object and get an array of objects in a rails app that utilizes Angular.js on the client side.
Here’s the scenario. You have a site you created locally. It has file uploading. You have a domain name. You don’t want to take forever compiling assets and doing all that stuff to push the code to a server.
Okay, that’s probably not a lay up that you have all those things. But I had to find a way to get those images to same in production and find an easy way just to push the code to production.
Let’s start from the top. Heroku. Things to note here. You have to use at least rails 3 and ruby 2. I was not using ruby 2 so we have to go into our gemfile and add the line:
ruby ‘2.0.0’
and then run the bundler. You might have an issue or two with other gems but the bundler usually tells you that you can do to fix it.
Now, Heroku also requires you use a Postgresql database in production, so we need to take our sqlite3 db and add it to the test and development groups on our gem file and add the ‘pg’ gem to our production group. Bundle it. Okay Heroku is “ready”.
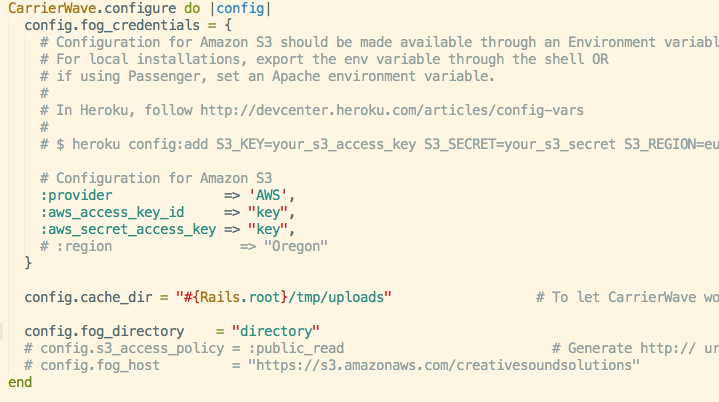
Now on to AWS. This is where I will be storing my files that are uploaded to my application. Since CarrierWave is just hosting them locally, I will need a way for those files to work in production. To set up AWS, you need to first go and create an account. I’m not going to tell you how to do that. First, you need to add the “fog” gem to your gemfile and bundle.
Then make an initializer file. Mine is called “carrierwave.rb” because I am using carrierwave for file processing. Here is my initializer file:
Pretty simple all we have to do if add our aws_access_key_id, aws_secret_access_key, and our fog_directory. Super simple, and now when we upload files they will be saved in our backer on S3.
Let throw it up on heroku and see what’s going on. Follow this tutorial if you don’t know how to set yourself up on Heroku. It’s a joke how easy it is.
But now we have a app on Heroku and the files are storage on AWS so they will work in production, but now we want to use our super cool domain that we bought from GoDaddy. No problem. Enter DNS Simple.
We head to DNS Simple, and set up an account. After we log in, we add a domain. Then we go to services, and scroll down to Heroku and click on that. Then we go back and click on the Advanced Editor where we see our domain with an ALIAS and CNAME. Change the content of the ALIAS to your url (with the www) and the content of the CNAME to your heroku app’s url. This tells your domain to redirect everything to your heroku url. Now head on back to heroku and go into the settings of your app. GO down to url’s and add the the cool url.
You have now successfully pushed an app to production, made the files work in production, and set up that code on your fancy url. Nice
Okay I’m back. When we last left we had two request for the current app I’m working on. We nailed the first, now on to the second task. We are supposed to allow the client to upload files so that people can download them from the app. Again, no idea before I started.
Well here’s something nice, I already am using CarrierWave and feel pretty comfortable with it. A thing to note is that most people assume this gem is only good for uploading images (likely due to the Railscast episode). It’s not, actually its great for many files (I am currently upload .mp3, .mp4, .mov, and .wav files).
So I know how to upload the files, but how do you view the file or download it?
I stumbled upon how to view the file when I was trying to make it download:
We are simply linking to where the upload attachment is. Now for download:
Here we are linking to the attachment url and downloading the file. Not bad once you know how to do it.
Today has been a great day for me thus far. For the current site I am working on, the client requested two features recently:
1) Allow him to reposition images(order)
2) Allow him to upload files and have his clients view/download them
Cool. Had no idea how to do either off the top of my head. Let’s try to tackle the first one.
On a high level, I was thinking this process should go something like this:
See if an object had been updated
Find out which object that was
See the new position is has and if that position is already taken up
Track whether that object went up or down in position
Change the other positions accordingly
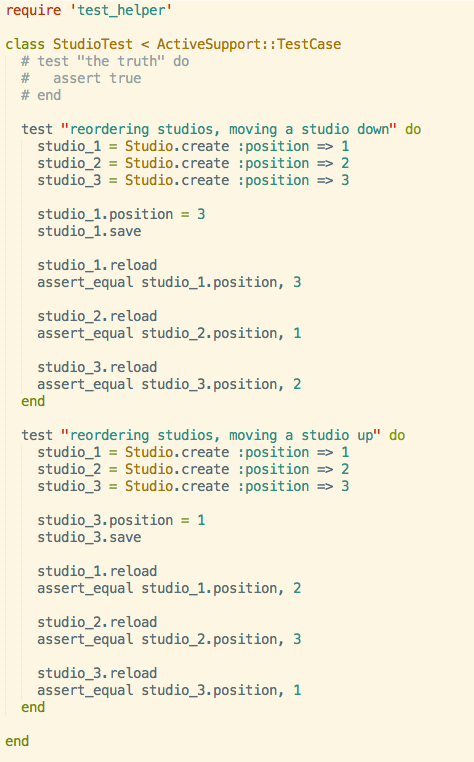
Myself and Avi were actually constructing the code to write this whole thing out. We started by writing a rails test:
Here we are testing to see if we change the position of a studio, we need the other studios’ positions to change accordingly.
Now here’s the real issue, all of the CRUD of an object in this app is being done by Active Admin. Actually I guess it wasn’t so hard to know where to look to solve this problem…callbacks.
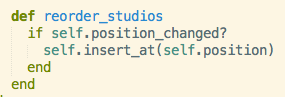
Cool we here the best this to do is the have a before_save callback. We need to check if the current object has been changed. But wait, duh, there’s this thing called acts_as_list that does the reordering for you. Luckily, this gem has a method (:insert_at(#)) that not only inserts the object where you want it but also reorders the list, doing the heavy lifting for us.
Great. The idea that this process requires a before_save callback is right, and now we just need to connect the dots. We must ask if a object has been changed, then insert it accordingly:
and bam, we can change any object to have a different position and the rest of the positions are reordered, and it works with Active Admin. Check.
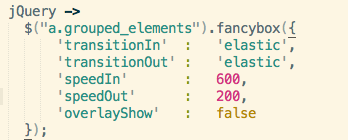
Cool, so one of the features my latest client is asking me to do is adding is an image gallery of their studios. After searching around for a little bit, I stumbled upon the Fancybox Rails gem. Cool, let’s check it out.
This gem is great, it adds all the assets required for Fancybox to your assets, and all you have to do is add:
//= require fancybox
to your application.js file and:
*= require fancy box
to your application.css file.
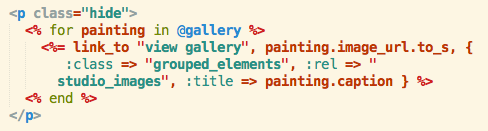
Awesome. Now that all of that is squared away, let’s get to work. In our controller we are working with this array:
This is an array of all the pictures we are working with. If we want to loop through all of these, we use the following code:
If we throw on a little jQuery, we get a workable Fancybox:
What happens here is were are looking through all the paintings in the gallery and setting them to the same :rel. This allows Fancybox to know all images with :rel “studio_images” is to be grouped together in a gallery.
The problem here is that we now have eight links, with all eight links opening up to the same gallery. That’s not good, we want one link to open to all of the images in the gallery. Cool, let’s solve this problem.
How about we make two instance variables in the controller, one for the first image, and one for the rest, this way if we ever delete the first image, another will replace it. The benefit here is that there will be no image duplication because between the two arrays, we will have all the images, but no duplicates.
So now we have these two variable, and we need to make a link in the view to open the gallery. Let’s do that:
If you have noticed, both lines of code have different id’s, can you guess why? If we have both lines of code, we will have eight different links. We only want one link, let’s hide the second array.
And you are left with one link which points to all the images in your gallery, good work.
I’ll admit, I am not an authority figure when it comes to front end. I’m not talking about things like Bootstrap, I’m talking about getting super down and dirty within a stylesheet.
I had a fun little problem to solve yesterday when working on the site for my current client. The client wanted the page the user was currently on to be highlighted in the navbar.
I immediately thought to add some sort of conditional, but went strait to Stack Overflow to see what programmers before me have done.
Turns out, there are two ways you can do something like this. In both scenarios, we are going to create a helper method, but the helper method can check different things.
For those who are not making a navbar dynamically, I would suggest using the following:
This way, you can have the helper method return some thing (in this case, the name of the new class) depending on what controller the request is using.
If you are going to dynamically create the navbar, I suggest you do something like this:
This way, the helper is checking the request url, and simply passing in the path. I actually found this second way of doing this buggy because the root path becomes highlighted for all the other paths.